Saturday, September 26, 2015

Coconut oil

I love these wonder products that stow away in your press minding their own business until word gets out how amazing and versatile they actually are... 

Like the almighty baking soda I use this product in my every day life. In baking as a pesticide and most commonly for me in cleaning the house.

Another wonder product I never let myself run out of is coconut oil. I call it my top to toe inside out product. I use it everyday in baking and cooking, when I'm frying or roasting anything from meat to pancakes. When I'm baking anything for myself and my little girlies il use it as a replacement for butter.

In my beauty regime I use it as a hair mask as it's so conditioning. It's renowned for it's benefits in dental hygiene, the technique word is Pulling. You take a teaspoon of coconut oil place it in your mouth and swish it around for approx 20 minutes. I recommend doing this when you are free from distractions!!!

Iv used a mixture of honey and coconut oil as a face mask which left my skin feeling amazing and why not try a sprinkle of sugar in the oil to make a gentle exfoliant not just for your face but for the whole body.

Another way I use this product is on my animals and as I have dogs, cats and horses in my household I find it so beneficial. Coconut oil has anti bacterial and anti fungal properties so for wound care I would liberally apply it to cuts as it will help fight infection. It can be mixed in with all their foods which will promote gut health.

This summer I found Winston was tormented with grass mites on his legs so I would lash this on and found it really did relieve the itch and helped heal the irritation. From the scratching.

I use cococnut oil as a hoof conditioner on the horses which really helps with the dry cracks and general condition of their hooves in warm dry weather.

Here is an über quick healthy recipe for choc chip banana bread to try out mid week when your trying to eat clean {then indulge on the naughty cakes at the weekend}

For this recipe you will need 
3 bananas
1 tablespoon of coconut sugar
1/4 cup of peanut butter
3 tablespoons of coconut oil
2 eggs
1/2 cup of coconut flour
1/2 teaspoon of baking soda
1/2 teaspoon of baking powder
1/2 teaspoon of salt
1/2 cup dark choc chips

Pre heat your oven 160'c. In one bowl add in all your dry Ingredients and the choc chips and mix well.

In another bowl whisk your eggs and when light and fluffy add in the mashed banana and whisk up again. 

Lastly add in the coconut oil and peanut butter and mix mix mix until it looks well combined.

Pour the dry Ingredients into the wet and fold altogether.

I used a 1lb loaf tin which I lined with baking paper, once the mixture is poured into the tin pop it in the oven for approx 25-30 minutes. 

When the timer goes check the banana bread with a tooth pick and if it comes out clear it's ready to gobble.

I love this banana bread warm with a cup of coffee. I also like to slice it up and freeze the slices as it will keep all week for you.

Enjoy
Rebecca x

Saturday, September 12, 2015

Teddy bear tutorial

Today I thought I would show you something completely different on my blog and that is a step by step guide to making a fondant teddy bear to sit on top of all these cakes Iv been making with you...


For this teddy bear you will need.

Brown fondant
White fondant
Black fondant
Edible glue/water

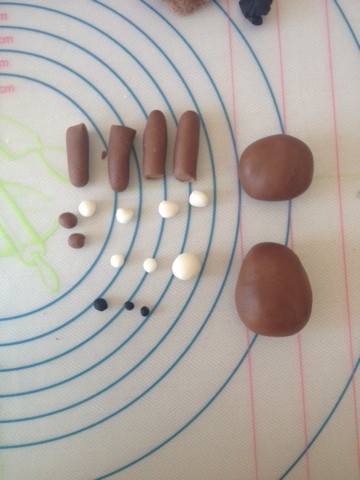
Start out by taking your brown fondant and breaking off pieces for the body, the head, the arms, the legs and last but not least the little ears.

The body is the biggest part of the bear so begin with that. Take the lump of fondant and roll it in a circle between the palms of your hands.

Once the fondant is smooth and soft gently make the shape of pear by rolling one end of the ball this will give the appearance of the teddies upper body and the rounder part will be the cuddly belly.

Next take the piece of fondant that you put aside for the head and roll it around in a circle between the palms of your hand. Keep doing this until the ball is smooth and soft in texture.

Time to make the teddies limbs you want the legs to be thicker than the arms but you will use the same method for them all.

Roll each limb out like a snake one at a time on the palm of your hand. You want to keep them short and cute as they will just hug the teddies tummy.

For the ears you just want to make two small fondant balls.

So now to assemble, take your body and sit it upright so it slightly flattens at the bottom and can sit on it's own.

Take your glue or water and dab a tiny bit on the top of the body and sit the head on top pressing it down on it.

Next take your legs and flatten one end, paint the glue on the inside of the flattened part and stick to the side of the bottom of the teddy.

Once the legs are on repeat the same method with the arms and stick them onto the teddy at shoulder height with the ends of the arms resting on the legs while hugging the side of the body.

Now glue on the ears.

Take your white fondant and roll out six little balls two for the ends of the arms, legs and lastly the ears. When u have them all rolled out one at a time gently flatten them out with the tip of your finger so it looks like a teeny tiny disk then glue them on like paws and the inside of the ears.

Roll out a slightly bigger ball for the Teddy's face and flatten it like a disk on the palm of your hand. Dab on some glue a sit the fondant on the Teddy's face.

Lastly with the black fondant roll out two tiny balls for the eyes and one slightly bigger ball for the nose.

I made the Teddy's smile by using a knife...

Let me know how you get on with your very own teddy and post it on my twitter @NumNum_Bakes 

Enjoy
Rebecca x

Thursday, September 10, 2015

Top uk food blogs

So I'm sitting on a wall near the Red cow hotel waiting for my new tyres to be put on the jeep and I'm scrolling down through my emails mumbling to myself that I need to unsubscribe to half of the spam that comes in.

But today I got a nice email from Rebate zone saying that they have ranked me 31 in their top 50 uk food blogs.

Check out the link below for all the food blogs in the list.


Enjoy
Rebecca x

© Num Num Cupcakes. Powered by