Sunday, August 25, 2013

Tried + tested Glenisk's pop up shop

Back in the day I was in Dublin city 5-6 days a week doing my Leaving Cert and then on to a few years of college. But these days it's with a lump in my throat that i say that it's once in a blue moon that I get to saunter through St Strephens Green or ogle after the macarons in Brown Thomas.

So when I was up in town a few weeks ago for a foodie day out I knew there was a few foodie spots I had to check out while I had the opportunity. One place that has been buzzing on twitter in recent weeks is Glenisks pop up shop on Dawson street.

When I first walked into the pop up shop I was so impressed with the whole look it was so airy with big windows kitted out with fabulous old milk jugs that I would love for my own collection. Their organic products were displayed all on one wall it reminded me of Willy Wonka but for yogurt lovers HA.

Hats off to the girls working there they were incredibly inviting they couldn't have been more helpful, they went through every dish on their menu board I really couldn't decide.

One of the dishes that did excite me on the menu was their Irish smoked salmon for me that was a no brainer. 

This pot is so ridiculously More'ish il be ordering seconds next time. Firstly you have these chunky pieces of Irish smoked salmon along with  a small handful of capers, a sprinkling of freshly chopped dill, freshly crack black pepper and a drizzle of lemon infused olive oil YUM.

Now that combo alone is a match made in heaven but Glenisk go one further and rest this winning combo on top of a generous dollop of their organic Greek style yogurt. It's super light and velvety and doesn't have that overwhelmingly tangy aftertaste some Greek style yogurts can have ...

So put this altogether and you end up with a rocking little pot perfect for that impromptu picnic in St Stephens green or even better yet leg it in there for a lunch pot and don't forget they do dessert pots too..

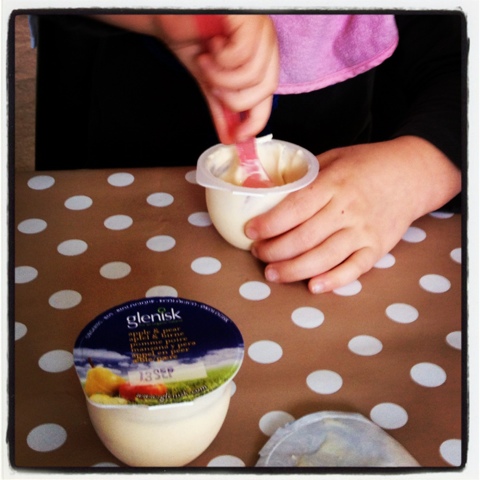
Glenisks organic yogurts for Children are a winner with my wee girlies too and now that Lottie-daisy will be starting pre school next week the portion in the pots are perfect for her morning snack along with her fruit...


Well worth a walk up Dawson's street 

Enjoy
Rebecca xx


Friday, August 23, 2013

A celebratory summer pie

This summer has been so unbelievable my garden has never looked so good Lottie-daisy has had some serious fun on Victoria plum( that's the ponys name don't ask) and we have hit the beach proper Irish style, flasks of tea ham sandwiches and ice creams on the way home.

But something that I have really loved this summer is going for long walks with the hubby and our wee ones along the country lanes around our house foraging for blackberries. It reminded me of when I was a young'un and my Nanos + Jackie(the grand parents) would come down from dublin and stay with us in the sticks for weeks on end. One of the things we used to do with Nanos was go for long walks, well they seemed long for our little legs...and on the long long walks apart from getting stung by nettles and having to spit on dock leaves to get rid of the sting was pick what felt like a million blackberries to make tarts for my dad and Jackie to devour.

So this summer has definitely added a bunch of happy memories to my little family's lives. And in celebration of this summer iv come up with this celebratory pie, for this recipe you will need:
THIS RECIPE MAKES 2 PIES!!!
Pie base:
175g plain flour
25g icing sugar
100g of cold butter
1 table spoon of cold water
1 egg yolk

Pie Filling:
6 sweet apples
200g Irish strawberries
200g of fresh Irish blackberries
1 cup of sugar

Vanilla batter:
3/4 cup of butter 
3/4 sugar
3 eggs
1/2 cup of glenisk whole milk
1 1/2 cups of odlums flour
1 teaspoon of baking powder
1 teaspoon of vanilla

Serve with glenisk creme fresh 


 Firstly begin to make the pastry crust. I like to combine it by hand but if you have a food processor be my guest.  In a bowl pop your flour, icing sugar and diced cold butter. next rub the contents through your fingers and thumbs basically until all the butter has reduced into teeny tiny pea like crumbs. Next I pour in the tablespoon of water and one egg yolk and combine . Once its come together plonk it out on your board and knead it briefly so as it rolls out perfectly but not to much that makes it tough as old boots!!!


Next roll it out nice and thin making sure its large enough to fit in your flan tin. A little trick I saw on the telly box one time was if you get a scrap of left over pasty roll it into a ball it works as the perfect tool to press your pastry into the sides of your crinkly tin.

Pop tinfoil over the pastry leaving the pastry uncut over the sides, then pour some baking beans over that. Pop in your pre heated oven at 190' for 10 minutes. After that trim edges and pop back in uncovered for a following 8-10 mins. Once thats done take out and let cool.

Next for the filling peel and slice the apples into even pieces, chop the strawberries in half but leave the blackberries as they are. Evenly pop them all round the pastry base then sprinkle over your sugar.

Now for the vanilla batter cream the sugar and butter together then add the eggs one by one and mix for for a few minutes. Next add the vanilla and butter milk before adding the flour and baking powder. 

Once your batter is made dollop the mixture speradically around the pie filling when baked this sponge mixture will have oozed in and around the apples and berries..

Pop the pie in the oven @ 180' for 35minutes. When baked the berries will be bubbling in delight the vanilla sponge will be golden in colour, oh and your kitchen will smell divine  that's a sure sign your pie has baked to perfection...

A generous dollop of avenmore whipped cream is a match made n heaven. This pie is amazing hot...


Enjoy

Rebecca xx


Rainbow peppers + potato tart


So whilst we are in full swing of national potato day I have a fantastic but equally as simple potato tart for you all to whip up. When we went on our potato pilgrimage last week to the Ballyknocken school of cooking Catherine showed us how easy it was to put together a potato tart. For hers she used caramelised onions and thyme with salad potatoes, well it was divine so I thought to myself have a look in your fridge girl + see  what happens.

For this recipe you will need:
1 roll of puff pastry
1 cup of homemade tomato sauce(see previous blogs)
1/2 red pepper
1/2 Yellow pepper
1 teaspoon of chopped thyme
1/2 cup of ricotta cheese
4 medium queen potatoes already cooked
Olive oil 
Salt and pepper to season
Rocket to garnish

Pre heat your oven to 200'c. Unroll your puff pastry no need to roll it thinner it will be thin enough.

 Cut your pastry into 4 pieces then ladle on the tomato sauce leaving the edges clean. Next slice your potatoes thinly and place them onto the pastry evenly, follow this with your thinly sliced peppers. Then with a spoon dollop the ricotta in and around the potatoes. Lastly drizzle with olive oil and season with salt and pepper. 

Pop the four mini tarts in the pre heated oven for 25mins. The pastry should be golden in colour and puffed up nicely on the sides. I liked to garnish the tarts with some fresh peppery rocket, absolutely gorgeous and so so simple.

Sunday, August 18, 2013

Tried + tested mr Hollywoods cob

In the world of baking there is one craft that gives me huge satisfaction + that is bread making. The process from beginning to end demands such precision that one lazy move on your part + it all goes belly up.

The chemistry alone is fascinating such as the relationship between the yeast + salt, it's like an old fashioned disco boys on one side girls on the other with the dance floor in between. HA funny but its true with Paul Hollywoods recipes for bread he explicitly says in your bowl add the yeast on one side and the salt on the other as the salt will effect the yeast and make it lazy I suppose.

So for this cob recipe I literally read it and read it again followed it to the letter, when mr Hollywood tells you to knead the dough for 5-10 minutes by god you knead that dough for 5-10 minutes I think I kneaded it for a good 10 minutes with the fear of failing.

Long story short this is a super beginners bread and once followed properly is a smashing bread to make over and over.

For this recipe you will need:
500g strong flour
10g salt
10g instant yeast
30g butter softened
320ml cool water 

Firstly in a bowl I popped in the flour + then sprinkled the salt in one side + the yeast on the other. Pour most of the water in on the flour + add the soft butter, next combine them all together as your mixing add the remaining water drop by drop.
Keep combining until the inside of your bowl becomes clean.

Lightly flour your work surface and plonk out your dough + begin to knead the bread, I preferred the folding technique where you fold it back on its self and then turn its to the side and fold again. Repeat this for ten minutes you'll certainly feel this in you arm and wrist but hang in there it will be so worth it

Once 10 minutes is up you will end up with is silky springy dough mr Hollywood would be proud of. For the cob you need to transform this into a sphere do this by tucking the dough under itself whist constantly swiveling it.

Pop your dough in a bowl which you have slicked with oil and then cover with a tea towel for 2 hours or until your dough has doubled in size. After 2 hours plonk out the risen dough on your lightly floured work surface + knock it back down briefly, shape it again into a sphere but this time pop onto the baking tray + then pop into a clean plastic bag. Leave for an hour to prove. Take the tray out of the bag dust the cob lightly with flour and lastly slash the cob with a knife...

Pop in the oven for 30minutes @230'. What I did for the last 3-4 minutes was turn the bread around to even the colour out on the bread. Once your timer goes off take out your loaf + give it a tap tap under neath, you should get a distinct hollow sound if so bobs your uncle you are now the proud owner of a mr Hollywoods cob 

Enjoy
Rebecca xx

Tuesday, August 13, 2013

The Irish blog awards 2013


So I'm sitting on the couch around this time last night with the hubby watching obviously something boring on the Telly box as there I am scrolling down through twitter.

I notice a tweet saying the long list nominations for best food/drink awards are out, so I immediately open it to have a good nosey at the lucky ones.

I am scrolling down through all the familiar names that I'd see on a daily basis all thanks to the world of twitter and the community that has evolved from the Irish food bloggers page, god bless it that's all I have to say I'd be lost without it. 

Anyways I'm getting side tracked there I am scrolling down looking at all these names thinking you lucky bunch of "duckers"....then all of sudden I'm disgusted there's a blog on the list that is the exact same blog name as mine. 
The cheek of it I'm gobsmacked so I click into it to see what it's like + surprise surprise it's MINE I can't believe it,  not for a second did it dawn on me that it was my blog I remember looking at them all last year and been in awe of the whole idea of been picked...

I'm so thrilled my blogs been acknowledged talk about motivation lets get bigger + better

Thanks for everything
Rebecca xx

Sunday, August 4, 2013

My orange cake with fresh Raspberries

Well if you liked my last blog about my orange + poppy seed cake you are going to love this other version of that cake. It is still the amazing mouth watering orange cake but with juicy fresh raspberries instead of the dinky wee poppy seeds

For this recipe you will need:
2 cups of butter
2 cups of sugar
4 eggs
1/2 cup of orange zest
Juice of 1 1/2 oranges
3 cups of plain flour
1/2 teaspoon baking powder
1/2 teaspoon baking soda
1/2 teaspoon
3/4 cup of buttermilk 
125 g of raspberries


Firstly cream your butter + sugar until pale in colour, next add in your 4 eggs one at a time what I actually like to do is beat the eggs together in a separate bowl + add that to the mixture I find its less likely for the eggs to split.

Once their all combined add the juice + zest of your oranges well. In a separate bowl sift together all your dry ingredients + by hand fold it in to your wet mixture along with the buttermilk .

Grease and flour your two loaf tins and pour in your cake mixture mankins sure their even. Lastly pop in your raspberries evenly throughout the cake mixture pushing them down slightly.

Pop in the oven for 45mins @ 160'

Once out I also drizzled these cakes with an orange simple syrup. Then when cooked I drizzled over an oozy orange drizzled which I included crushed fresh raspberries so the drizzle would take on the crazy pink colour...

An absolutely gorgeous cake to serve for any occasion

Enjoy
Rwbecca


My orange + poppy seed cake

Big things were happening this weekend in my house, the hubby was coming home from Canada for good + all I can say is there is two little girlies who were bursting with excitement. It was as mad as Christmas Eve last night. We were like the Walton's in my bed I was hanging out the side while the mini num nums were like star fish HA...

it's a given that we'll be having visitors + that also we'll be calling round to family + friends, so any excuse for mento come up with a cake recipe for the blog. And I know iv mentioned the love affair my grand dad had with all things sweet before but a real favorite for him when he and my Nanos would come stay with us down in the sticks was an orange cake I can still smell the fragrant cake that filled the kitchen. 

So I'm using this occasion to finally give an orange cake with a twist of course a go..

For this recipe you will need:
2 cups of butter
2 cups of sugar
4 eggs
1/2 cup of orange zest
Zest of 1 1/2 oranges
3/4 cup of buttermilk 
3 cups of plain flour
1/2 teaspoon of baking powder
1/2 teaspoon of baking soda 
1/2 teaspoon of salt
1/4 cup of poppy seeds
This recipe will make two 2lb loaf cakes

Firstly cream your butter + sugar until pale in colour, next add in your 4 eggs one at a time what I actually like to do is beat the eggs together in a separate bowl + add that to the mixture I find its less likely for the eggs to split.

Once their all combined add the juice + zest of your oranges well. In a separate bowl sift together all your dry ingredients + by hand fold it in to your wet mixture along with the buttermilk .

Lastly sprinkle in the gorgeous blue, grey + black dots that are your poppy seeds into your batter and evenly combine.
Pour your cake batter into two loaf tins which you must grease and flour before hand so the yummy cakes don't stick.

Bake for 45 minutes @ 160'
Once out of the oven I trickled a simple syrup over the cakes
made from 1/2 cup of orange juice with 1/2 cup of sugar. The when the cakes were completely cooled I drizzled the cakes with an orange glaze made from 2 cups of icing sugar + just enough orange juice that it makes an oozy consistency...

Enjoy
Rebecca x


Friday, August 2, 2013

Caramelized pears with cinnamon swirls

Sometimes in life all you need is a ridiculously decadent dessert but without all that prep and major stress...well look no further below is the recipe for my swirly cinnamon cups filled with caramelised pears and toasted almonds...

For this recipe you will need:
1 roll of puff pastry
6 pears
100g of dark chocolate
2 tablespoons of cinnamon
2 tablespoons of brown sugar
2 tablespoons of ground almonds
1/2 cup of toasted almond flakes
Butter
Extra brown sugar 

So lets gets started firstly unroll your pastry out flat then evenly sprinkle your cinnamon, sugar + ground almond onto your pastry.

Next roll up your pastry like it was in the beginning + cut into 8 pieces. At this point you will see the cinnamony swirls beaming back at you they look divine. 

With your rolling pin or with a glass tumbler which ever comes to hand  gently flatten each swirly section like a saucer. Once their all flattened sit each of them in to a cupcake tray + pop into your preheated oven @ 160' for 20minutes or until lightly golden.

While your cinnamon swirly cups are baking away peel + roughly dice your pears then pop them in a pot with with the smallest nob of butter. Once your pears have began to bubble + soften sprinkle in 1/2 a table spoon of light brown sugar this will help caramelise the pears. Gently test the pears with a cake tester to see if they are fully cooked the last thing you want is your pears to resemble baby mush, that would be a major fail!!!

Ok so your cinnamon swirly cups are baked and out of the oven cooling on a baking tray, your pears are ready for take off. So the last things to prepare before you assemble this magical dessert are to toast the almonds on the pan + melt your plain chocolate over a double boiler.

On your dinky serving dish place out your swirly cinnamon cups, spoon in a small amount of the pears into each cup. Next drizzle over the melted chocolate + lastly sprinkle on the toasted almonds YUM!!!

This dish will get you major brownie points for really very little stress at all

Enjoy
Rebecca x


© Num Num Cupcakes. Powered by